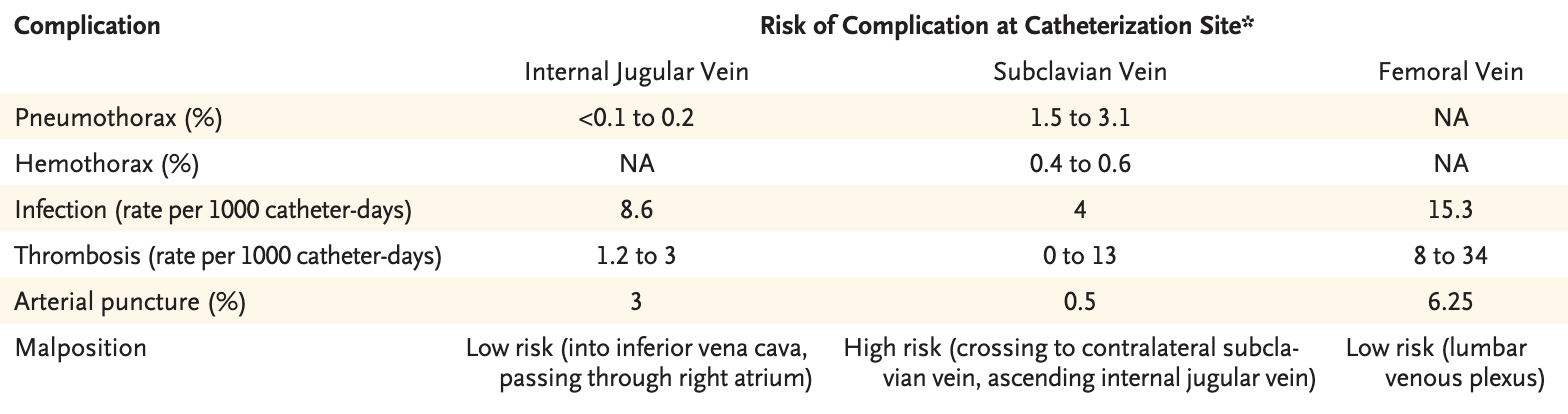
Line related infections appear to be lower with the subclavian approach
Contraindications
Infection of area overlying the target vein
Thrombosis of the target vein
Fracture or suspected of the clavicle or proximal ribs
Coagulopathy - applying direct pressure at the subclavian artery or vein is difficult
Relative
Chronic kidney disease because of the increased risk of subclavian venous stenosis associated with this technique may compromise future venous access for dialysis
Patients with severe hypoxia or apical bullous lung disease owing to the risk of Pneumothorax which may lead to further respiratory compromise
Method
Place the patient in a 10-15 trendelenburg position
Turn the head so the chin points away from the vein and place a small role under the scapula to make the calvicle more prominent
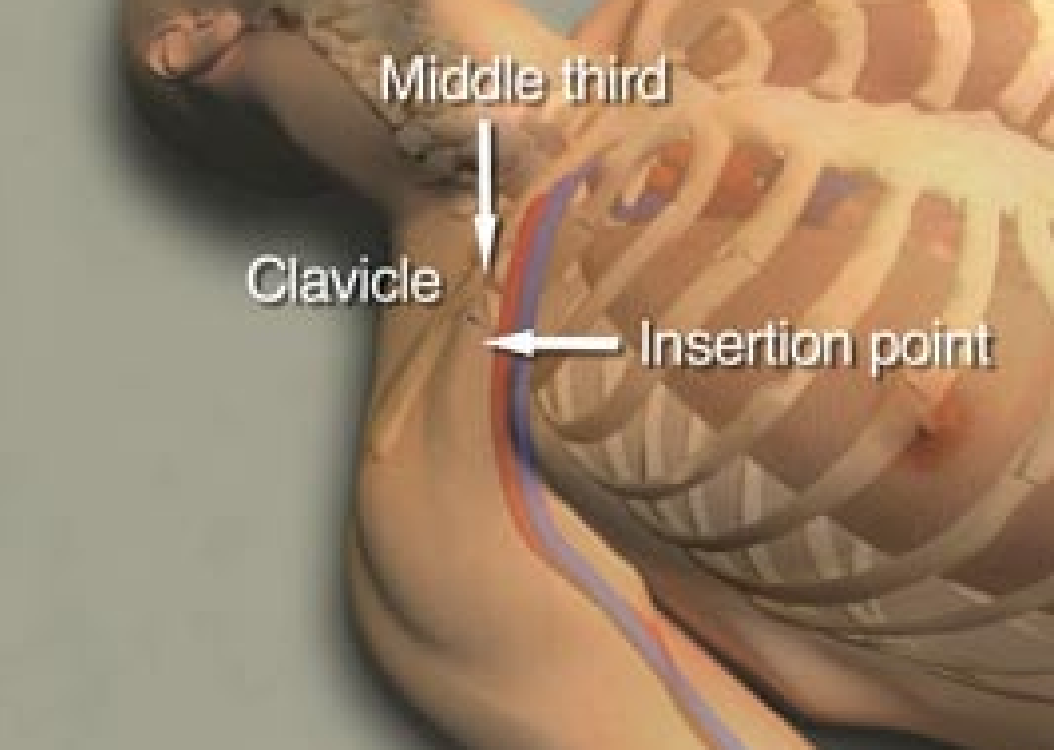
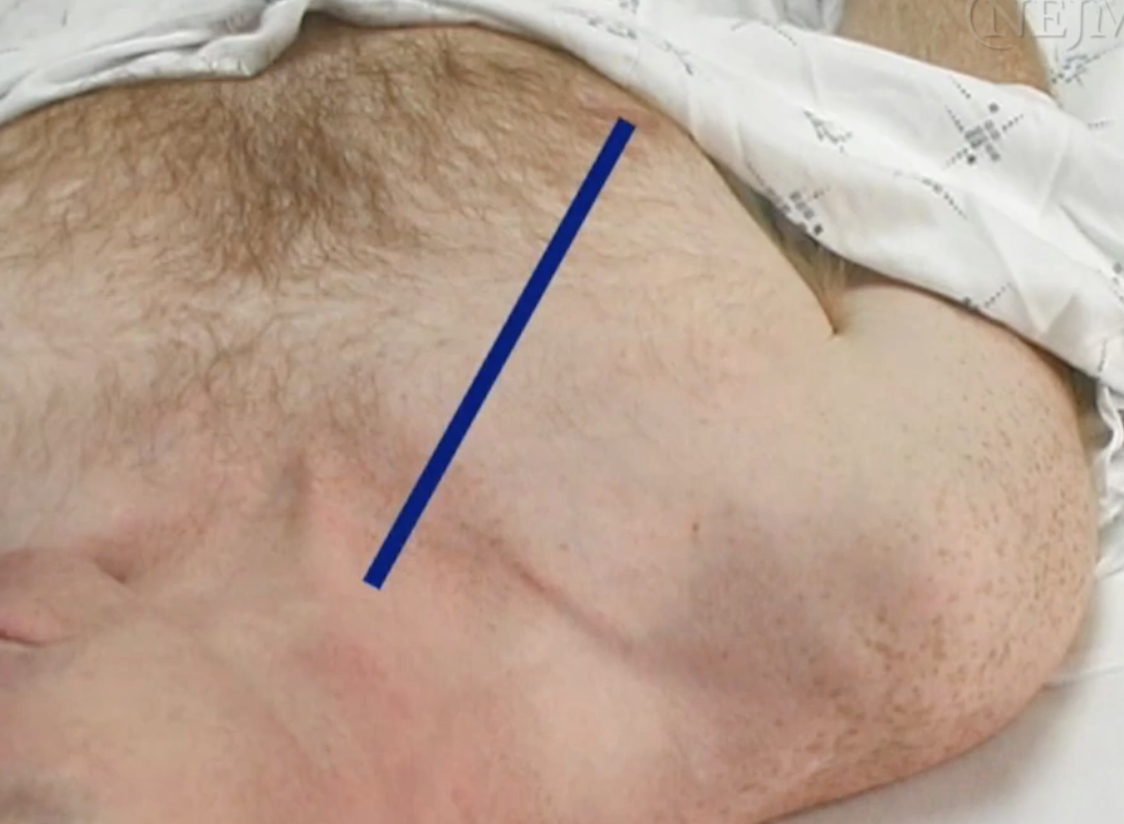
Identify the posterior deviation (middle third) of the clavicle
Clean and drape the site
Flush the lines of the central line with heparin or saline
Ensure the guidewire threads easily through the needle
Remove the port through which the guidewire will be threaded (commonly the longer lumen)
Use local anaesthetic to anaesthetise the area
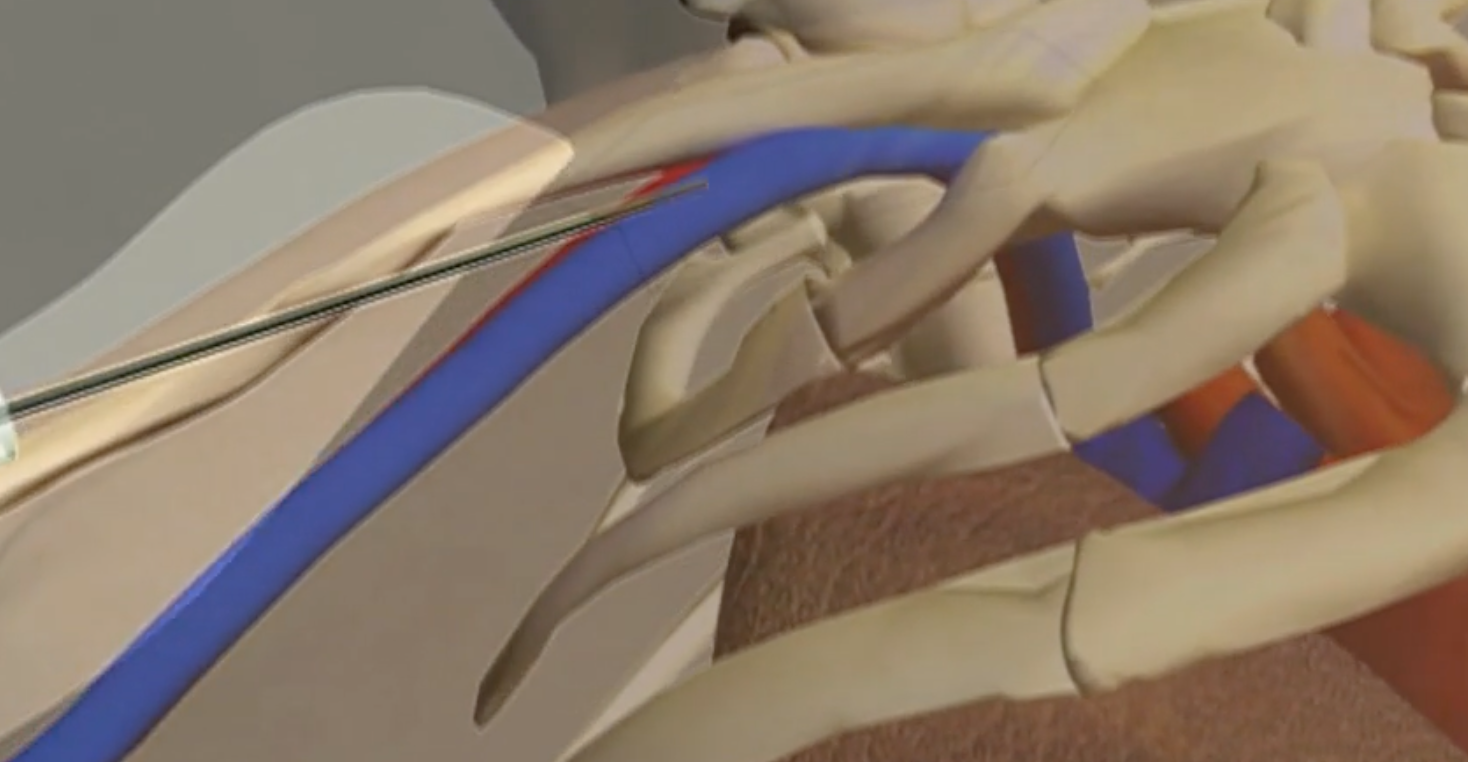
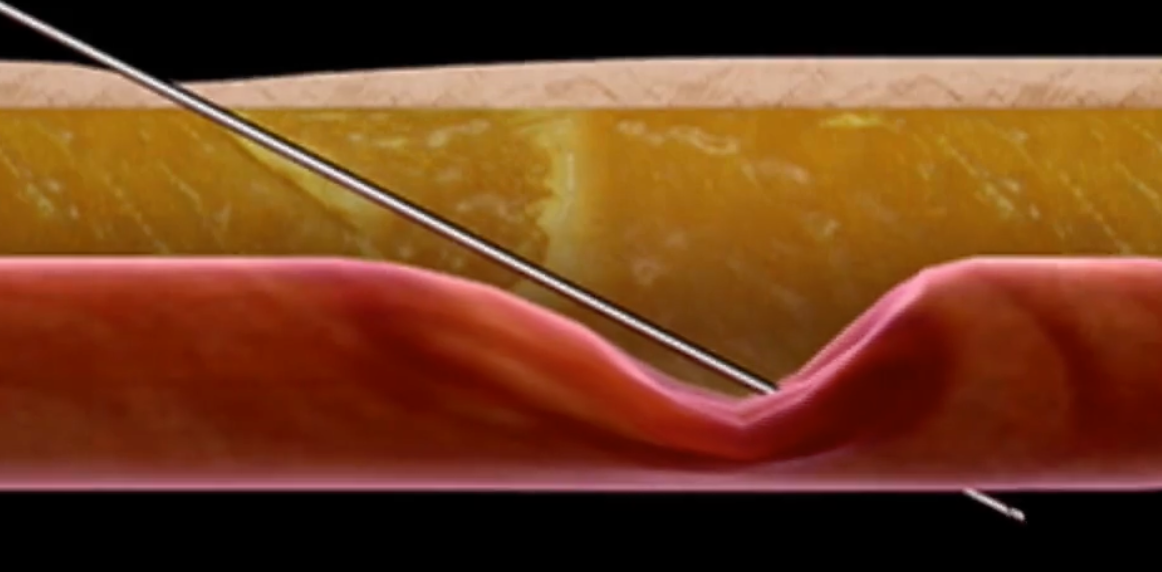
Approach the site at a 30 degree angle to the skin with the long axis of the needle aimed towards the sternal notch
Track the needle just below the clavicle
Feed the wire through the needle
Have an assistant watch the monitor watching for signs of arrhythmia; if they occur, withdraw the needle until the cease
Withdraw the needle leaving the guidewire in place
Make a small superficial incision at the insertion site to facilitate entry of the dilator
Place the dilator over the wire ensuring to have control over the wire at all times
Advance the dilator 1-2cm with a rotating motion, being careful not to cause a bend or kink in the wire
Remove the guidewire and maintain a grip on the wire
Feed the catheter over the guidewire making sure the end of the guidewire can be seen outside the catheter hub
Grasp the external end of the guidewire, advance the catheter over the guidewire using a rotating motion
If the catheter does not advance smoothly, the track may not have been adequately dilated; remove the catheter and insert the dilator
If it is suspected that the catheter might be in the artery check by connecting to a pressure transducing system
Remove the guidewire and check for blood return in all ports
Flush all ports, place caps on the hub and secure the port before removing the drape
Obtain a chest X-ray to assess for proper placement and ensure no haemothorax nor pneumothorax
Internal Jugular Vein
Right internal jugular vein is preferred because it provides more direct access to the right atrium, avoids the thoracic duct and reduces procedure time
Method
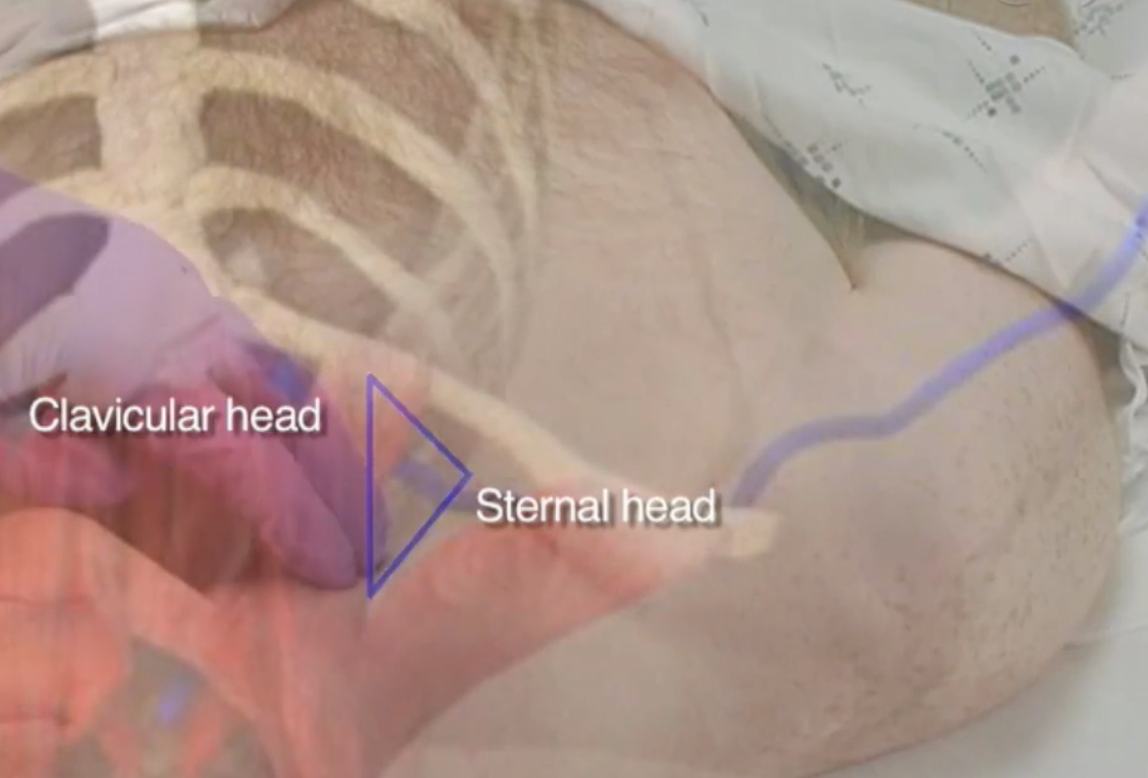
The internal jugular vein can be found at the apex of the triangle formed by the sternal and clavicular muscles of the sternoclavicular muscle
Place the patient in a 10-15° trendelenburg position to prevent air embolism and to engorge the vein or alternatively place a wedge between the patient’s legs if not contraindicated (e.g. high intracranial pressure or congestive heart failure)
Turn the patient’s head away from the vein
Determine the location of the carotid pulse, noting that the jugular vein runs just lateral to the carotid artery - the needle should enter at the apex of the triangle identified above and should be aimed towards the ipsilateral nipple
Place the ultrasound probe at the site of insertion (identified in previous step) and identify the vein and artery
Clean the skin with sterile solution and drape the patient
Explain to the patient that they can signal for attention by raising their hand and their breathing will not be obstructed
Place the microclaves on the end and flush the catheter (do not place the microclave on the largest lumen as this is where the guidewire will thread through)
Ensure the guidewire threads easily through the needle
Ensure the guidewire threads easily through the catheter
Prepare the ultrasound cover
Confirm the needle insertion site again
Apply local anaesthetic
Insert the insertion needle at a 45 degree angle to the coronal plane angled towards the ipsilateral nipple
Advance the needle while applying gentle suction; typically the vein is accessed at a depth of <1.3 cm
Typically flash of venous blood typically occurs when the needle is withdrawan due to the collapsibility of the vein
Once steady flow is achieved, with the non-dominant hand place down the ultrasound and obtain a steady hold of the needle (and remove the syringe)
Check with a transducer
Thread through the guidewire - an assistant should watch the monitor and watch for PVCs during advancement of the guidewire
Withdraw the needle leaving the guidewire in situ and grasp the guidewire at the skin
Make a small superficial incision at the entry point of the wire
Pass the dilator over the guidewire being certain to maintain control of the wire and insert it into the skin by holding it close to the tip and entering with a rotatory motion
Remove the dilator anticipating increased bleeding using a gauze pad
Feed the catheter over the guidewire being certain to maintain control over the external end of the wire before being advanced into the patient
While grasping the external end of the guidewire advance the catheter over the wire using a rotatory motion; if resistance is met, the tract may not have been adequately dilated → repeat from step 21
Check that all ports withdraw blood and flush and ensure to place the caps/microclaves on the ends
Secure the line in place with suturing
Apply a sterile dressing
Obtain a chest X-ray
Aftercare
Minimise the number of times the lines is accessed
Access the line under sterile or clean conditions
Prepare access site with alcohol based solution
Reassess need for central line daily
Sources
Braner, D.A.V., Lai, S., Eman, S., Tegtmeyer, K., 2007. Central Venous Catheterization — Subclavian Vein. New England Journal of Medicine 357, e26. https://doi.org/10.1056/NEJMvcm074357
Schulman, P.M., Gerstein, N.S., Merkel, M.J., Braner, D.A., Tegtmeyer, K., 2018. Ultrasound-Guided Cannulation of the Subclavian Vein. New England Journal of Medicine 379, e1. https://doi.org/10.1056/NEJMvcm1406114
Ortega, R., Song, M., Hansen, C.J., Barash, P., 2010. Ultrasound-Guided Internal Jugular Vein Cannulation. New England Journal of Medicine 362, e57. https://doi.org/10.1056/NEJMvcm0810156
Graham, A.S., Ozment, C., Tegtmeyer, K., Lai, S., Braner, D.A.V., 2007. Central Venous Catheterization. New England Journal of Medicine 356, e21. https://doi.org/10.1056/NEJMvcm055053