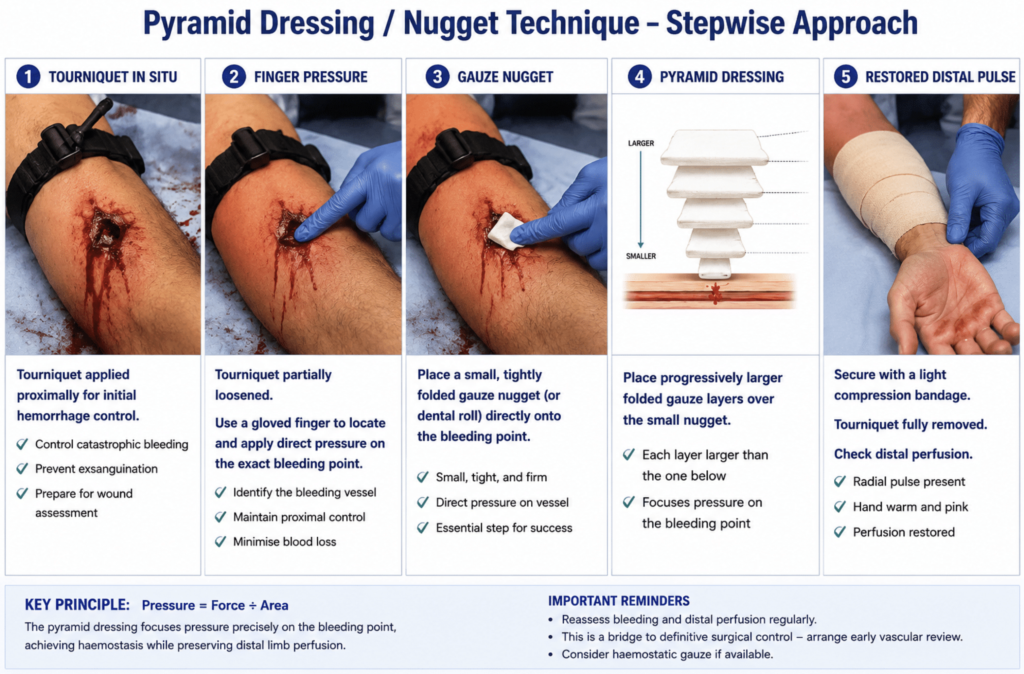
- Prepare before releasing the tourniquet
- Keep proximal haemorrhage control in place while the team prepares. Have ready:
- sterile gauze
- haemostatic gauze, if available
- a compression bandage
- suction and good lighting
- immediate ability to re-tighten the tourniquet
- Warn the team before loosening the tourniquet.
- Expose and identify the bleeding point
- Carefully expose the wound.
- Slowly loosen the tourniquet only enough to identify the bleeding point. If brisk bleeding recurs, apply direct finger pressure immediately.
- Place the gauze nugget
- Replace the finger with a small, tightly folded gauze nugget or dental roll positioned precisely over the arterial defect
- The nugget must sit directly on the bleeding point; if it is off-target, the rest of the dressing will fail no matter how tightly it is wrapped.
- Haemostatic gauze may be used for the nugget when available.
- Build the pyramid
- Place progressively larger folded gauze layers over the nugget.
- Each layer should be wider than the one below it
- The small lower layer focuses pressure; the broader upper layers stabilise the dressing and prevent the pressure point from shifting.
- Secure without strangling the limb
- Secure the dressing with a compression bandage.
- The aim is focused pressure, not maximal circumferential compression.
- A well-built pyramid dressing should control the bleeding without needing to occlude the entire limb.
- After securing the dressing, reassess:
- Bleeding through the dressing
- Radial/ulnar pulse
- Capillary refill
- Skin temperature and colour
- Motor and sensory function
- Pain out of proportion
- If haemorrhage recurs, reapply direct pressure, re-tighten the tourniquet if required, and escalate
- Importantly treat the pyramid dressing as a bridge to definitive haemorrhage control, not a substitute for vascular repair.
Source